This is Part 3 SpringBoot Roles and Privileges implementation for our Inventory Management System (InventoryMS).
In this tutorial, we would actually implement the Roles and Privileges in our Inventory Management System.
Content
- The Basic Approach
- The Fine-Grained Approach
- The Roles Management Classes
- The Controller Endpoints
- How the savePrivileges Work
Now, let’s take some time to understand how management of roles and privileges work in Spring Boot. There are two approaches to handling Roles and Privileges in SpringBoot.
- The Basic Approach
- The Fine-grained Approach
1. The Basic Approach: User-> Roles -> Privilege Relationship
The User -> Role relationship could either be one-to-many or many-to-many.
This means a User could have more that one role
The Role -> Privilege relationship could also either be one-to-many or many-to-many
Generally, a Role would have multiple privileges
Also, a user assigned a given role, would inherit all the privileges under that role ( we would not use this approach, we would use a more fine-grained approach)
To assign a User additional permissions, you could either:
- assign the User additional Role that includes the desired permission
- add the desired permission to the Role the User currently holds
2. A Fine-Grained Approach: User -> Privilege, Role -> Privilege
In this application, we would use the Fine-Grained Approach. The Basic Approach was used in FleetMS version 2.
As mentioned above, if a user is assigned a role, he would automatically inherit all the privileges under that role. However, we would use this approach.
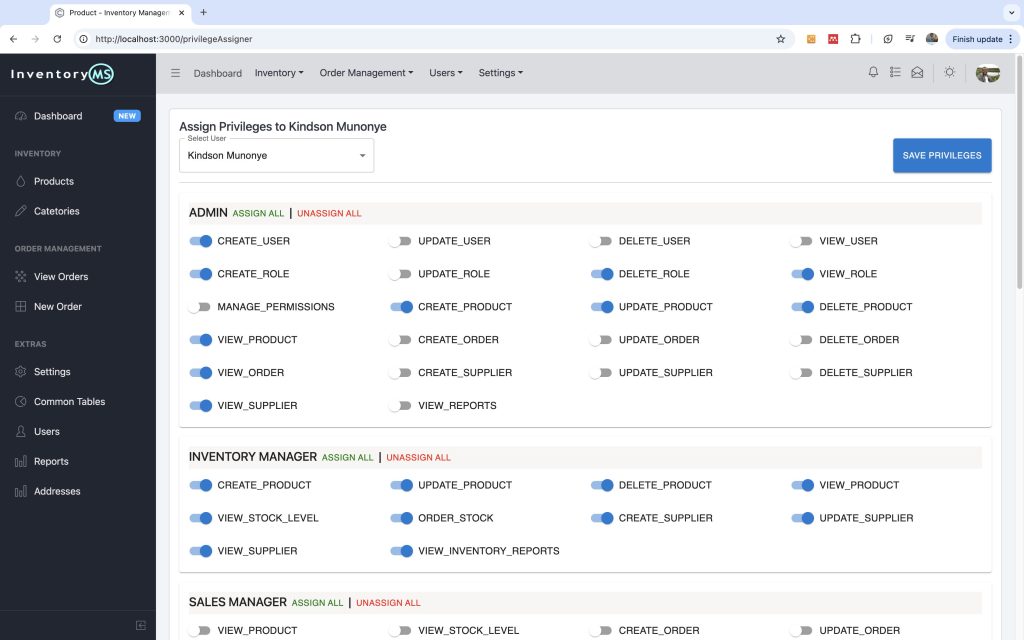
In the fine-grained approach, a users could be assigned privileges from any role. This means that a user could be assigned some privileges from the ADMIN role and some privileges from the FINANCE MANAGER role.
This also allows us to assign a user all the privileges under a given role if needed.
AssignAll and UnassignAll
Since a user has privileges and each privilege belongs to a role, we could implement ‘Role Assignment’ by assigning the user all the privileges belonging to specific role. Same for unassign as we. The screen appears as shown below:

3. Implementing the Roles Management Classes
The following classes would participate in the Roles Management implementation:
- User – create a OneToMany relationship between User and Privilege
- Role – create a OneToMany relationship between Role and Privilege
- Privilege – create a ManyToOner relation from Privilege to Role
- UserPrivilegeAssignment – relates both User and Role (we use this so that we don’t have to do a ManyToMany as this is a bit tricky to manage ????)
We have chosen these models in such a way to avoid a many-to-many relationship since this is a bit tricky while working with Roles and Privileges in SpringBoot.
4. Implementing the Controller Endpoints
We would need the following controller endpoints in addition to the 5 standard methods (getAll, getOne, add, edit, delete):
| Description | Route | Implemented In Controller |
| 1. Save privileges | POST: /user/{id}/privileges | UserPrivilegeAssignment |
| 2. Get User Privileges | GET: /user/{id}/privileges | UserPrivilegeAssignment |
| 3. Get Users in Privilege | GET: /privilege/{id}/users | UserPrivilegeAssignment |
| 4. Clear assigned privileges | PUT:/user/{id}/privileges/clear | UserPrivilegeAssignment |
| 5. Assign Role (assign all privileges in role) | PUT:/role/{roleid}/assign/user/{userid} | Role |
| 6. UnAssign Role (unassign all privileges in role) | DELETE:/role/{roleid}/unassign/user/{userid} | Role |
| 7. Get Privileges in Role | GET:/role/{roleid}/privileges | Role |
5. How savePrivileges Work
This controller method takes a list of Privileges retrieved from the request body as well as the user id retrieved from the path variable.
It updates the user privileges by performing two steps:
- Step 1- clear existing user privileges
- Step 2 – assign the new privileges provided
Note that this two steps has to be performed within a transaction. The function is given below:
//1. Save privileges
@Transactional
@PostMapping("/user/{userid}/privileges")
public ResponseEntity<String> saveUserPrivilegeAssignments(
        @RequestBody List<Privilege> privileges,
        @PathVariable Long userid) {
    try {
        userPrivilegeAssignmentService.deletePrivileges(userid);
        List<Privilege> savedPrivileges = userPrivilegeAssignmentService.savePrivileges(privileges, userid);
        return ResponseEntity.status(HttpStatus.CREATED).body(savedPrivileges.toString());
    } catch (Exception e) {
        return ResponseEntity.status(HttpStatus.INTERNAL_SERVER_ERROR)
                .body("Failed to delete user privileges: " + e.getMessage());
    }
}
In the next part, we would understand the concept of Granted Authorities in Spring Boot. Then we would use our API to set up access restriction to our API endpoints.


One thought on “InventoryMS – SpringBoot Roles and Privileges 2 ( The Data Model and API)”