 by
by In Tutorial 7, we learnt about Loops( For, For..in, While and Do…While).
In this tutorial, we would learn about Loop control statements.
These are statements you can use to alter the normal flow of control in the loop. For example, you may have to terminate a loop before it’s complete execution. Another situation may be that you may need to skip part of the loop based on certain criteria. In situations like this, JavaScript provides the break and continue statements.The break statement helps you come out of a loop prior to its normal completion while the continue statement helps you jump tot he next iteration of the loop.
Let’s now discuss these statements in more details
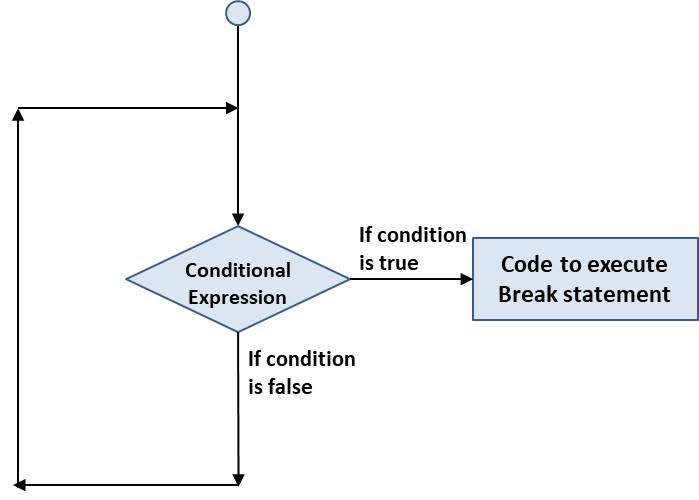
1. The break Statement
You us the break statement when you want the loop to terminate before its execution completes. So when the program encounters a break statement, it jumps out of the body of the loop to the statements following the loop. Remember this is the same break statement used with switch statements in Tutorial 7.
The flowchart for the break statement is shown below
Let’s take an example.
The code below shows a loop looping from 1 to 10. But a break statement is encountered when the value of x reaches 5.
<html>
    <head>
    <title>Break Statement Demo</title>
    </head>
   <body>
      <script type = "text/javascript">
         <!--
         var x = 1;
         document.write("Begining of Loop<br /> ");

         while (x < 10) {
            if (x == 5) {
               break;   // breaks out of the loop
            }
            x = x + 1;
            document.write( x = + "<br />");
         }
         document.write("End of the loop!<br /> ");
         //-->
      </script>
      <p>Try using different value for x...</p>
   </body>
</html>
2. The continue Statement
The continue statement is used to tell the JavaScript interpreter to move to the next iteration of the loop. This means skipping the remaining part of the current iteration.
As an example, the code below encounters a continue statement at x = 5, the it skips the writing of the value of x and jumps to 6. So, if you run this code you will notice that 5 would not be written.
<html>
    <head>
    <title>Continue Statement Demo</title>
    </head>
   <body>
      <script type = "text/javascript">
         <!--
            var x = 1;
            document.write("Entering the loop<br /> ");

            while (x < 10) {
               x = x + 1;

               if (x == 5) {
                  continue;   // skip rest of the loop
               }
               document.write( x + "<br />");
            }
            document.write("Exiting the loop!<br /> ");
         //-->
      </script>
      <p>Try using different value for x...</p>
   </body>
</html>
3. Loop Control Using Labels
Labels can be used to indicate the particular loop that is being handled. This is because there can be more than one loop in a program. For example, we can have nested loops: inner and outer loop.
To add a label, simple specify the label name followed by a colon (:), before the loop begins.
Note: Line breaks cannot be placed between a label and its corresponding break or continue statement. The next example shows how to use a label with nested loops.
<html>
    <head>
    <title>Labels Demo</title>
    </head>
   <body>
      <script type = "text/javascript">
         <!--
            document.write("start of the loop!<br /> ");
            outerloop:        // This is the labe
            for (var i = 0; i < 5; i++) {
               document.write("Outer loop: " + i + "<br />");
               innerloop:
               for (var j = 0; j < 5; j++) {
                  if (j > 3 ) break ;           // Terminate the inner loop
                  if (i == 2) break innerloop;  // Same effect as above
                  if (i == 4) break outerloop;  // Terminate the outer loop
                  document.write("Inner loop: " + j + " <br />");
               }
            }
            document.write("End of loops!<br /> ");
         //-->
      </script>
      <p>Try changing the values of i and j...</p>
   </body>
</html>
Here’s another example. This example uses a continue statement to jump to the outer loop
<html>
    <head>
    <title>Labels Demo</title>
    </head>
   <body>
      <script type = "text/javascript">
         <!--
         document.write("start of the loop!<br /> ");
         outerloop:     // This is the label
         for (var i = 0; i < 3; i++) {
            document.write("Outerloop: " + i + "<br />");
            for (var j = 0; j < 5; j++) {
               if (j == 3) {
                  continue outerloop;
               }
               document.write("Innerloop: " + j + "<br />");
            }
         }
         document.write("End of loops!<br /> ");
         //-->
      </script>
      <p>Try changing the values of i and j...</p>
   </body>
</html>
I recommend you try to run all the code snippet. Also remember to watch the video for clarification.