 by
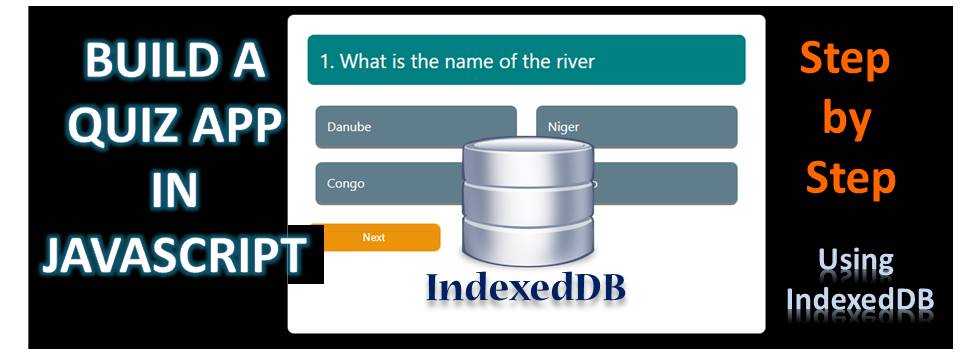
by In the previous tutorials, I explained how to build a quiz application. You can review them here.
Second Quiz App – with more features
We would then cover the following:
1. Create the index.html File and the Stylesheet
These have been explained in the previous part. So I would not spend time here. Meanwhile here are the two files:
index.html: You can create the html file and paste the content of this file
styles.css: Do same
scripts.js: this is the script that controls the quiz. It’s explained in Part 1
Now you can preview the index.html page
The Question Manager HTML
This is where we would be able to add and delete a quiz from the database. As mentioned, the database would be IndexedDB, which is a client-side database embedded in the browsers.
First create a html page, QuizManager.html.
Here is the content of the body section below:
<div class="header">
    <a href="start.html"> Home</a> |
    <a href="game.html"> Game</a> |
    <a href="index.html"> Quiz</a> |
    <a href="questionsManager.html"> Questions Manager</a>
</div>
<center><h4>Available Questions</h4></center>
<div id="questionBox" class="questionList">
</div>
<div class="ui form entryForm">
    <center><h4>Add New Question</h4></center>
    <div class="field">
      <input type="text" id="addQuestion" placeholder="Question">
    </div>
    <hr />
    <div class="field">
      <input type="text" id="addOption1" placeholder="Option 1">
    </div>
    <div class="field">
        <input type="text" id="addOption2" placeholder="Option 2">
      </div>
      <div class="field">
        <input type="text" id="addOption3" placeholder="Option 3">
      </div>
      <div class="field">
        <input type="text" id="addOption4" placeholder="Option 4">
      </div>
      <hr />
      <div class="field">
        <input type="text" id="addAnswer" placeholder="Answer">
      </div>
    <hr />
    <button onclick="addQuestionHandler()" class="ui button" >Add Question</button>
</div>
<script src="questionsManager.js"></script>
Go ahead to preview the html page.
Link the Stylesheet
Next, you need to add the link to the styles.css file to the header section. I also added the semantic ui cdn link as well. We use the sematic ui, for some styling.
<link rel="stylesheet"
href="https://cdnjs.cloudflare.com/ajax/libs/semantic-ui/2.4.1/semantic.min.css"
integrity="sha256-9mbkOfVho3ZPXfM7W8sV2SndrGDuh7wuyLjtsWeTI1Q="
crossorigin="anonymous" />
<link rel="stylesheet" href="styles.css" />
2. The Question Manager JavaScript File
Here is where we would write the logic to manipulate the database. So we would open the database, read the content and load it into the ui. Also, we would have a function to insert a new question.
You need to pay attention to this part. However, I have simplified it by breaking the code down into nine sections.
1. Open Request
The first step is to create a request object to open the database. We also declare a variable db to hold the response. If the database does not exist, it is created.
//1. Request to open the database,
var request = window.indexedDB.open("questionsDB", 1)
var db;
2. Open Succeeded
Specify what happens if the open request succeeded. In this case, we just read the question from the database and display them.
//2. The database is opened normally
request.onsuccess = function(event) {
    db = event.target.result
    loadQuestion(db)
}
3. Schema Changed
We also need to do this. This is in case, the database if being opened for the firs time. So we create an objectStore named questions
//3. The schema is changing or this is the firs time
request.onupgradeneeded = function(event){
    db = event.target.result;
    db.createObjectStore("questions", { keyPath : "id" });
}
4. Declare Elements
These are just the ui elements where we’ll display the question details as well as the options.
//4. Declare the elements for the question and options
//questionText, opt1, opt2, opt3, opt4, answer
var questionText = document.getElementById("addQuestion")
var opt1 = document.getElementById('addOption1')
var opt2 = document.getElementById('addOption2')
var opt3 = document.getElementById('addOption3')
var opt4 = document.getElementById('addOption4')
var answer = document.getElementById('addAnswer')
5. QuestionBank
An array to hold the list of questions.
//5. questionBank: Declare variable to hold the list of questions
var questionBank
6. addQuestionHandler
This is the handler function for the click event of the add button.
//6. addQuestionHandler(): Create a new question and call addQuestion()
function addQuestionHandler(){
    vQuestion = {
        id:(questionText.value).replace(/\s/g,''),
        q:questionText.value,
        options: [opt1.value, opt2.value, opt3.value, opt4.value],
        answer:answer.value
    }
    addQuestion(vQuestion)
    location.reload()
}
7. addQuestion() function
This function does the transaction to add a single question
//7. addQuestion: Actually perform the insert options
function addQuestion(question){
    var request = db
    .transaction(['questions'], 'readwrite')
    .objectStore('questions')
    .add(question)
}
8. deleteQuestion() function
This function deleted a question using the id
//8. deleteQuestion: Performs the actual delete operation
function deleteQuestion(){
    var request = db
    .transaction(['questions'], 'readwrite')
    .objectStore('questions')
    .delete(event.target.id)
    location.reload();
}
9. loadQuestion() function
Perform a read operation to retrieve all the questions. Load them onto the UI. Note the delete button, the onclick() attribute and the id attribute.
//9. loadQuestion(): loads all the question onto the UI
function loadQuestion(db){
    var transaction = db.transaction(["questions"]);
    var objectStore = transaction.objectStore("questions");

    objectStore.getAll().onsuccess = function(event) {
        var str = ''
        event.target.result.forEach(element => {
          var btnid = "id = " + element.id;
          str += '<p class="singleQuestion"><strong> '
          + element.q + '</strong> <button '
          + btnid + ' onclick="deleteQuestion()">Delete</button> <br />'
          + 'A. ' + element.options[0]
          + '  B. ' + element.options[1]
          + '  C. ' + element.options[2]
          + '  D. ' + element.options[3]
          + '</p>'
        });
        document.getElementById("questionBox").innerHTML = str;
    };
}

tҺe website іѕ really good, I like your blog!