 by
by In this tutorial, you will learn how to install Apache Spark on Mac and Windows.
We would take to following steps
- Install Homebrew
- Install Java
- Install Scala
- Install Apache Spark
- Verify Apache Spark Installation
- Install Spark on Windows
We’ll first go through Spark installation on MacOS. Next we go through the Windows installation as well.
1. Install Homebrew
Homebrew is a package manager for MacOS. You use it to install packages. So go ahead to install it using the command
/bin/bash -c "$(curl -fsSL https://raw.githubusercontent.com/Homebrew/install/master/install.sh)"
This command would install XCode command line tools and Homebrew
2. Install Java
Spark using Java tools for performing various operations. Therefore, you need to have Java installed in your system.
Install Java using the command:
brew install openjdk
Check Java installation using the command:
java --version
3. Install Scala
Spark was actually written in Scala. So we would need Scala installed as well.
brew install Scala
You can find Scala tutorials here
4. Install Apache Spark
You now need to install Spark using this command
brew install apache-spark
This command would install Apache Spark. You can then launch the Spark shell using the command below:
spark-shell
5. Verify Apache Spark Installation
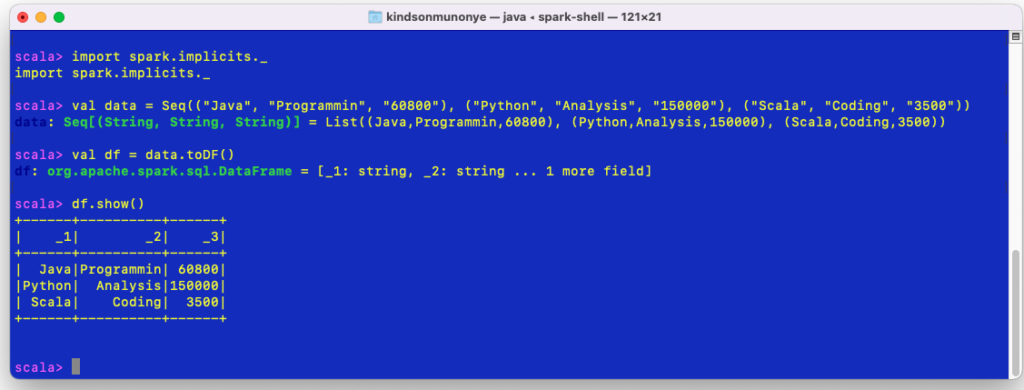
Let’s now validate Spark installation by writing a simple command that creates a Spark DataFrame
import spark.implicits._
val data = Seq(("Java", "Programmin", "60800"), ("Python", "Analysis", "150000"), ("Scala", "Coding", "3500"))
val df = data.toDF()
df.show()
Note: You can type the codes on line at a time
The output screen is as shown below:
6. Spark Installation on Window
Follow the steps below to install Apache Spark on Window.
Step 1 – Navigate the Apache Spark download page using this link – https://spark.apache.org/downloads.html
Step 2 – Download the tgz file
Step 3 – Unzip the file into a local directory
Step 4 – Create a directory path in your C drive and copy the Spark folder content into the directory
Step 5 – Set the JAVA_HOME, SPARK_HOME, HADOOP_HOME an PATH environment variables. Use the data below:
JAVA_HOME = C:\Program Files\Java\jdk18.0.1.1
PATH = %PATH%;%JAVA_HOME%

SPARK_HOME  = C:\apps\opt\spark-3.0.0-bin-hadoop2.7
HADOOP_HOME = C:\apps\opt\spark-3.0.0-bin-hadoop2.7
PATH=%PATH%;%SPARK_HOME%
Note: The directory path should be exactly the location on you local drive
Step 6 – Download winutils.exe for Hadoop and copy it to the bin folder in the spark path. Get it from here https://github.com/cdarlint/winutils
Step 7 – Open command prompt. Navigate into the bin directory of the Spark installation.
Step 8 – Start spark-shell just like we did in Mac
7. Access the Spark Web UI
Apache Spark comes with a suite of Web User Interface(UI) to help you monitor your spark application. The Spark Web UI can be access via the link: http://localhost:4040/
This is shown below
