
 by
by To be able to test out our service we need some GUI.That is what we would do in this part.
We would cover the following:
- The GUI we’ll Build
- Add a CommandGateway
- Create an Issue() and Redeem() Panels
- Create a Layout in the Init() Method
- Test the Application
1. The GUI we’ll Build
It is always good to have a sketch of what you want to achieve when building a GUI. Hence, the figure below shows a simple GUI we would build. It is made up of three components.
- Issue Panel for sending Issue Commands
- Redeem Panel for sending Redeem Commands
- Grid to display list of transaction

So let’s get started!
Important: Make sure that your vaadin version in your pom.xml is 8.4.1
Step 1: Create a java class in the gui package. Name it GiftCardGUI
Step 2: Make this class extend the Vaadin’s UI class
Step 3: Implement the init() method (right-click > generate > implement methods
Step 4: Annotate the class with the @SpringUI annotation
2. Add a Command Gateway
A command gateway is used to send commands from the UI to Axon asynchronously. We’ll do this through constructor injection.
Step 1: Add a private final variable to the class of type CommandGateway
Step 2: Below it, type in the code below: (you can also just click on ‘add constructor parameter’. This displays when you click on the yellow light-bulb that pops up when you hover over the line.
public GiftCardGUI(CommandGateway commandGateway) {
   this.commandGateway = commandGateway;
}
3. Create the Issue and Redeem Panels
Step 1: Copy and paste the code below to create the Issue panel
private Panel issuePanel() {
    //Create the text fields and submit button
    TextField id = new TextField("id");
    TextField amount = new TextField("amount");
    Button submit = new Button("Submit");

    //Add listener to the button
    submit.addClickListener(event -> {
         //Create a new IssueCommand using the text inputs
        IssueCommand cmd = new IssueCommand(
                id.getValue(),
                Integer.parseInt(amount.getValue())
        );

        //Sent the command to Axon
        commandGateway.sendAndWait(cmd);

        //Display a success notification
        Notification.show("Success", Notification.Type.HUMANIZED_MESSAGE);
    });

    //Create a form and add the textfields and button
    FormLayout form = new FormLayout();
    form.setMargin(true);
    form.addComponents(id, amount, submit);

    //Add the form to the panel
    Panel panel = new Panel("Issue");
    panel.setContent(form);

    return panel;
}
Step 2: Copy and paste the code again for the Redeem panel
Step 3: Adjust the content of the second code for the Redeem panel
4. Create a Layout in the Init() Method
We would not create a horizontal layout in the init() method. Then we add the two panels to the layout. Then we also add error handlers.
@Override
protected void init(VaadinRequest vaadinRequest) {
    HorizontalLayout commands = new HorizontalLayout();
    commands.setSizeFull();
    commands.addComponents(issuePanel(), redeemPanel());

    VerticalLayout layout = new VerticalLayout();
    layout.setSizeFull();
    layout.addComponents(commands);

    setContent(layout);

    //Error Handler
    setErrorHandler(new DefaultErrorHandler(){
        @Override
        public void error(com.vaadin.server.ErrorEvent event) {
            Throwable cause = event.getThrowable();
            while (cause.getCause() != null) cause = cause.getCause();
            Notification.show(cause.getMessage(), Notification.Type.ERROR_MESSAGE);
        }
    });
}
5. Test the Application
Before you can run the application, you need to first create a run configuration. To do that follow the steps
Step 1: Click on Run in the Menu. Edit Configuration as shown below

Step 2: In the Run/Debug Configuration, click on the ‘+’ at the upper left corner. Choose Maven from the list. Then enter the settings as shown below
- Name: gcdemo [spring-boot:run]
- Command Line: spring-boot:run
The complete setting is shown below

Step 3: Click on Ok
Step 4: Run the application by clicking on the Run button
Step 5: Go to http://localhost:8080. You will see the GUI displayed as shown below

Step 5: Issue and redeem a few giftcards to make sure it works
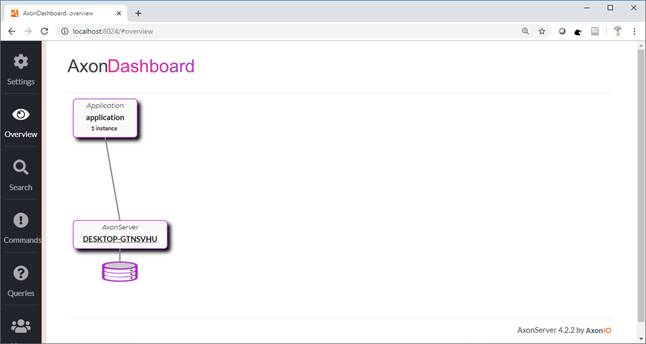
Step 6: Start the Axon Server. See Part 1 for how to start the Axon Server
The axon server Dashboard is shown below. You can see that our GiftCard application is running as an instance as shown below.
If you have come this far, then congrats!
In the next part, we would then see how to fetch data and display on the grid.


